February 15th, 2013
Progress has slowed down some since last update, but it hasn't stopped as I've mostly been doing wiring chores (which isn't that cool to take pics of). I completed laying track and wired the passing siding for Sonora, as well as installed the detection for the siding and main. Most of my time has been used up thinking about signaling. . . .
I made the mistake of researching how the SP and the ATSF did their signaling and kinda cracked open a can of worms. As I mentioned in an earlier update, signaling will be controlled through the Tortoise switch machines for the time being, until I really get further along with the layout and have time to do more research on full signal systems using DCC.
Weeeelllllll...... A few nights of lost sleep thinking about how to wire them and I've come up with a way for the signals to be 90% prototypical using common auto relays. (I've already ordered smaller and way cheaper relays, since I don't need a full 30amp auto relay for signal use) I say 90% because I'm not using any yellow or intermediate signal color. Just the standard red and green. And there is also no lag time from when a train leaves a block before the signal shows green again. These 2 things are pretty easy for me to overlook, as I don't think the money spent on a full 100% prototypical signal system would be worth it. I might change my mind later on, but for now, the price to get these signals up and running is super cheap. I used 8 relays and one side of the SPST on the Tortoise to control everything. So I'll do my best to show in words and pictures how these signals work on the layout.
.JPG)
Track installed and wired on Sonora Siding. Still got the main to do.
.JPG)
Block detector wired for Sonora main and siding. These detection circuits are made by Team Digital.
.JPG)
Local control toggle switch for south Sonora siding
.JPG)
US&S style Search Light signals made by Tomar.
.JPG)
All 3 signals. From left, single head for main (displaying red), single head for siding (displaying red), dual head for main (green) and siding (red).
.JPG)
It's a mess of wires right now, as this is just a temporary set up to see if I could wire up the signals correctly using auto relays. They will be replaced with smaller relays better suited for running the signals.
Ok, I will attempt to show a meet and how the signals are being run through pictures. Bear with me!
.JPG)
Southbound manifest heading toward June Lake
.JPG)
Northbound coal drag
.JPG)
Turnout thrown for main at South June Lake
.JPG)
North June Lake aligned for main....
.JPG)
....shows green (main) over red (siding).
.JPG)
Dispatcher throws the switch for the manifest to take the siding....
.JPG)
...signals change to red (main) over green (siding).
.JPG)
Manifest heads into siding....
.JPG)
....and after a few car lengths, the green pops to red (like prototype)
.JPG)
taking the siding
.JPG)
Meanwhile, the coal drag is slowly coming up the hill
.JPG)
passing each other
.JPG)
Caboose of the manifest is almost in the clear
.JPG)
Dispatch aligns switch for main
.JPG)
Single head signal for the main line gets a green.
.JPG)
Coal drag continues on with a green...
.JPG)
....and after a few car lengths the signal pops to red.
.JPG)
passing....
.JPG)
Almost in the clear
.JPG)
and as the last car of the train passes, the main line signal pops back to green (which is the 10% of unprototypical I can deal with)
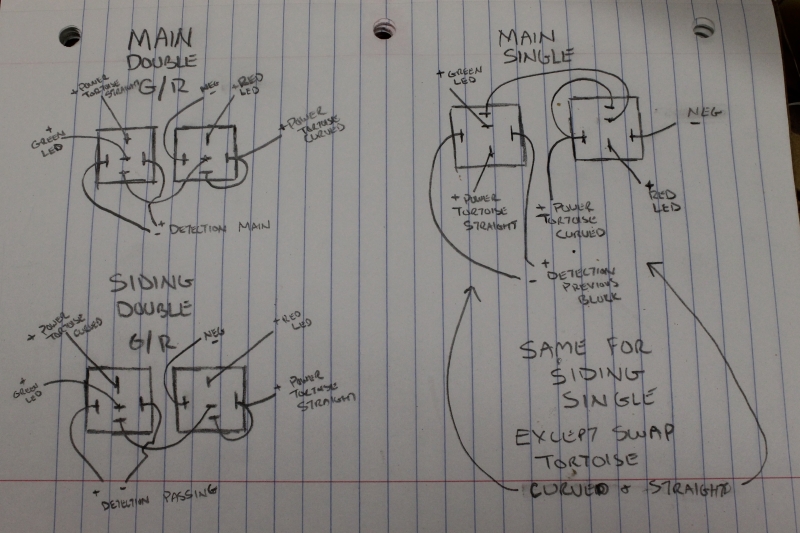
Here is the wiring diagram. "Neg" is 12 volts negative. "Power Tortoise curved" and "Power Tortoise
straight" is 12 volts positive coming from the Tortoise switch machine's SPST contacts.
If you decide you want to copy this wiring for your own signals, don't hesitate to email me if you run into problems. I know this diagram doesn't explain everything, as it was just drawn up for troubleshooting down the road.
Email is on the home page.
All material on The Owens Valley Subdivision website is Copyright 2007-2013 by Michael Stoner. None of the material (including text and photographs) on this web site may be reproduced in any form without prior written permission.